
The Setup
We all have those shots in a video that you love. The ones where everything goes perfectly. Focus pull is right on money, the action plays out on time, the lighting is better than you can imagine, the garbage can is predominately featured in the shot, the-
Wait...what?
There's a garbage can sitting there in the middle of the wilderness.
Is there supposed to be?
Nope.
Then we can't use the shot, right? Is there another one we can use instead?
Yes but they're not perfect like this one! There must be something we can do.
Oh there is something we can do. There is...
The Issue
Occasionally the perfect shot for an edit has some not-so-perfect elements to it that otherwise can cause the shot to be discarded as a usable take. In these instances editors often find themselves getting crafty with their cuts:
- Punch In (aka Zooming & Cropping, or Scaling): Unwanted lens flares? A car parked in a location that is supposed to be the middle of nowhere? An unaware crew member standing on the side of the frame? Often the simplest fix is cropping off the edge of the frame that has these elements, and scaling the footage up to compensate. This is even easier if you've shot in 4k and you are finishing to 1080.
- Trimming (aka End the Take Sooner): Boom mic drops into frame just before the end of a take? This is the easiest fix and all it takes is trimming the end (or beginning) of the shot to cover the mistake. Yeah, I said it was easy, right?
What's the point of this Jeff?
Hang on, I'm getting there. Be patient.
Back to the issue mentioned in the setup: what happens if the issue is predominate in the shot and the above doesn't work? That's where the next choice comes in:
- VFX (aka Remove the Garbage Can): The camera pans over and ends on a shot that is 90% perfect except there's a garbage can sitting in plain view of the audience. If it's a city street that could be fine, but this scene takes place out in the woods, on a trail. While I support throwing your garbage away is good (seriously, who doesn't?), a regular old garbage can sitting in the middle of the wilderness looks out of place and can quickly distract the viewer from the point of the video. So what do you do? You digitally remove it.
The Fix, Part 1: Deciphering Your Stuff
We don't have the budget or time to do digital work. That was outside of the project scope and the client won't care if the garbage can is there!
Editor's note: the previous statement is hypothetical, we always ask Jeff to make everything awesome >:)
I understand all of that, believe me. When planning for a shoot the director/financial folks don't tend to consider extra time for doing visual effects work on a regular project. And whether or not you should spend the time doing it comes down to personal choice. Often times there are things I'd love to get rid of from a shot but time constraints don't lend itself to a one or two-hour touch-up.
You have to figure out what the best option is for you based on a few factors:
- What needs to be fixed?
- How hard do you think it would be to fix?
- Where are you going for lunch?
- How much time do you have left before the project is due?
Okay, #3 isn't a necessary step but come on...eating is important here, folks.
Once those key points are figured out, it's a lot easier to determine whether your time on the shot is worth it, and for the sake of this article, let's pretend it is.
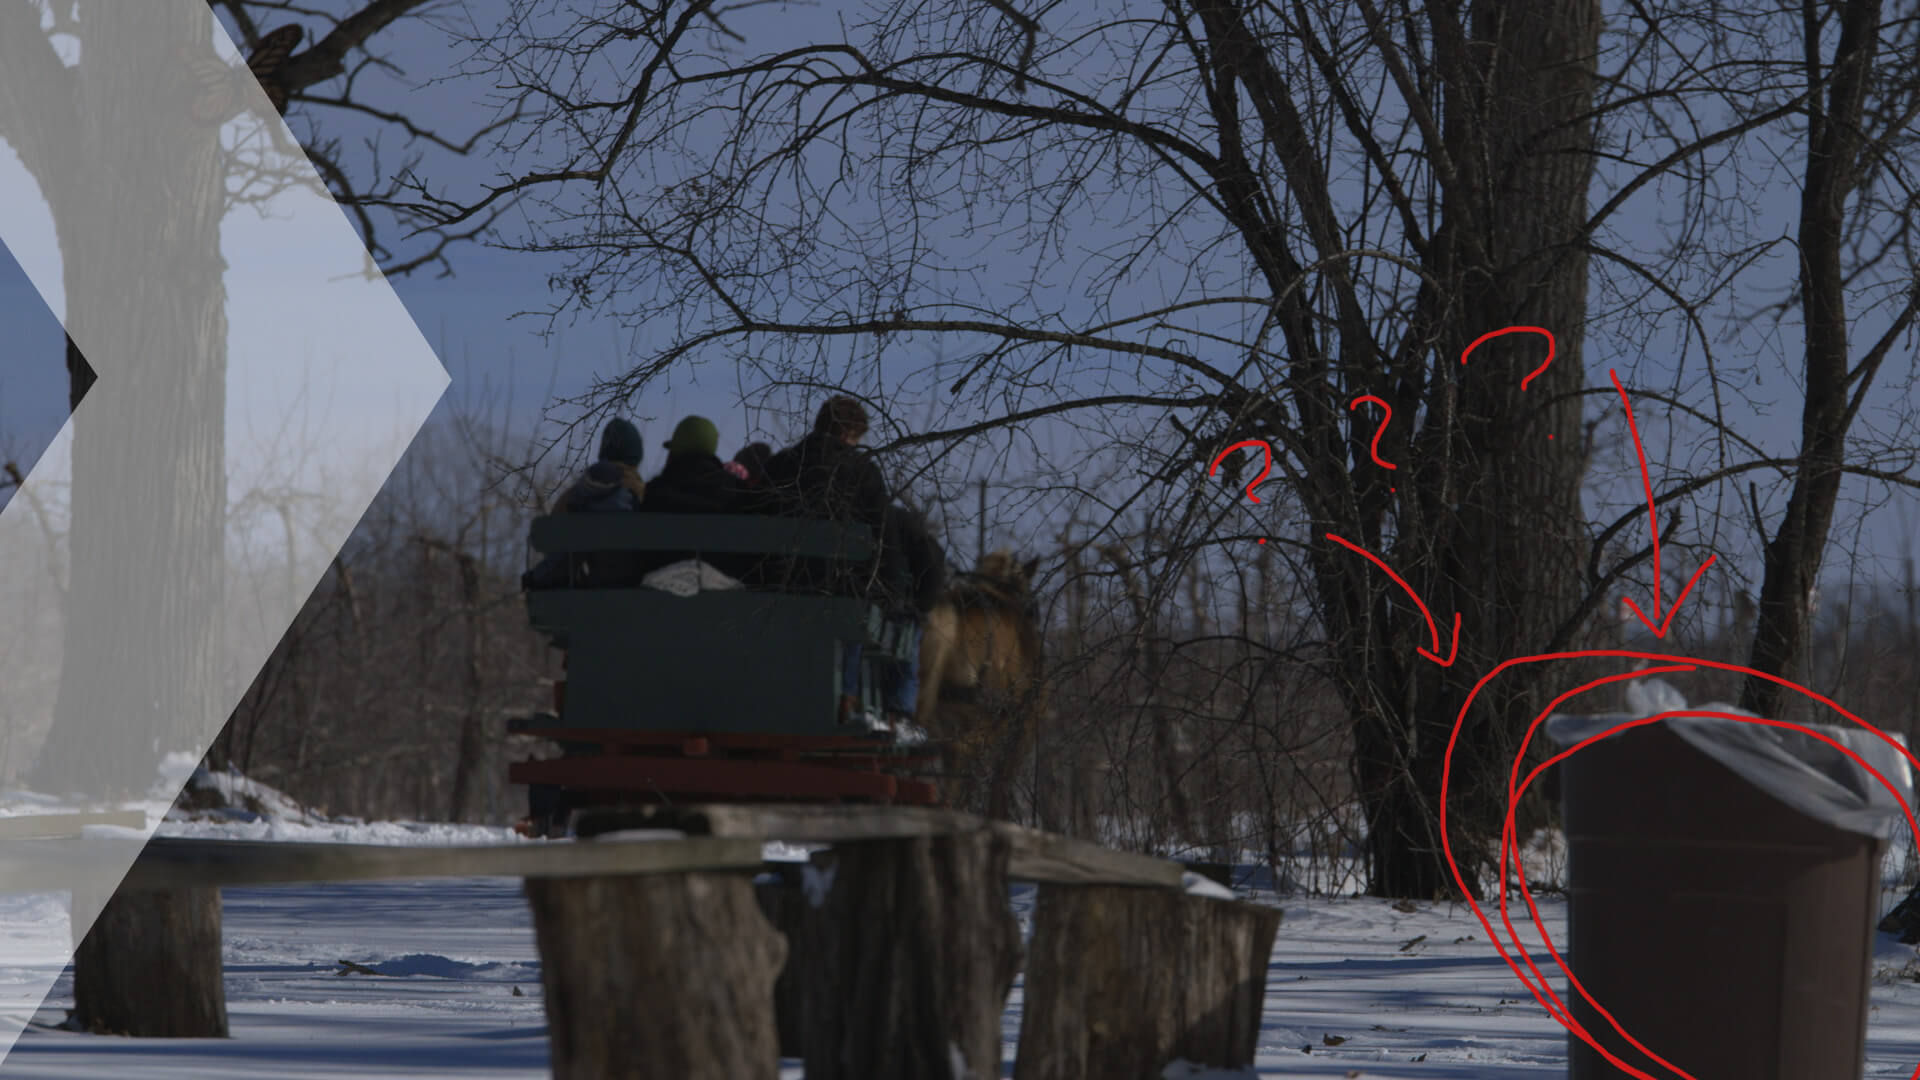
So what do you do? You're looking at the shot and you see this:
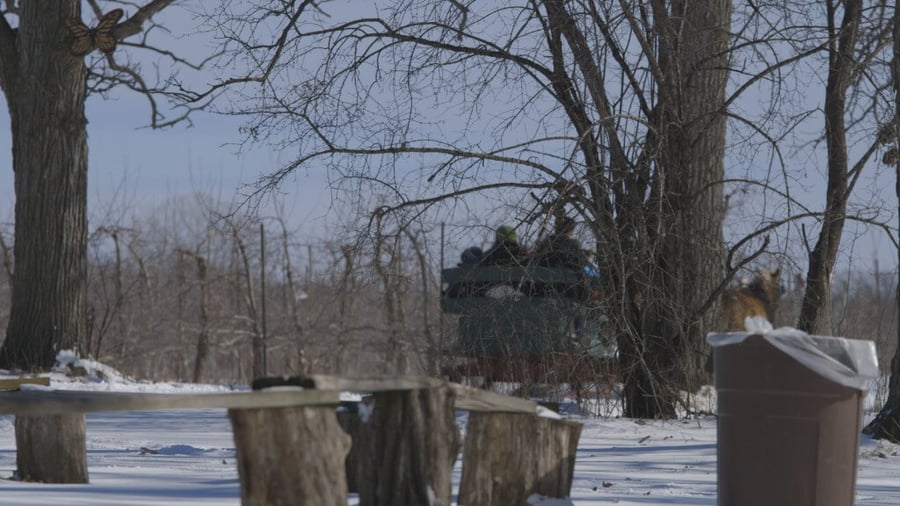
Yep, there's a garbage can just sitting there. Doing what garbage cans do...sit there.
A real wordsmith here.
Quiet you.
Looking at the shot you realize the following:
- The camera simply pans from left to right (with some slight extra bounces at the end but nothing crazy)
- The lens used during filming reduces parallaxing down to nothing, which will help with the compositing.
- You have other takes that have elements (such as trees or bushes) that can be used to cover the garbage can.
After realizing this, it can mean only one thing: a tutorial breaking down how to do the work!
The Fix, Part 2: The Actual Tutorial (No Really It Is)
- You start with your original plate opened in After Effects.
- Go up to ANIMATION and down to TRACK IN MOCHA AE, which will open everyone's favorite tracking software (when it works). Tell it to save the Mocha project wherever is most convenient to you (it doesn't matter if you actually save the tracking or not, you're only using Mocha AE for the tracking points and after that, you can do whatever you want with this save file).
- For this particular shot, the garbage can comes into frame midway through and stays in frame until the end of your edit. So scroll to the end of the IN and OUT that Mocha automatically created, and draw a rough mask around the garbage can using the X-SPLINE SHAPE TOOL (the pen tool with an X in the upper right corner).
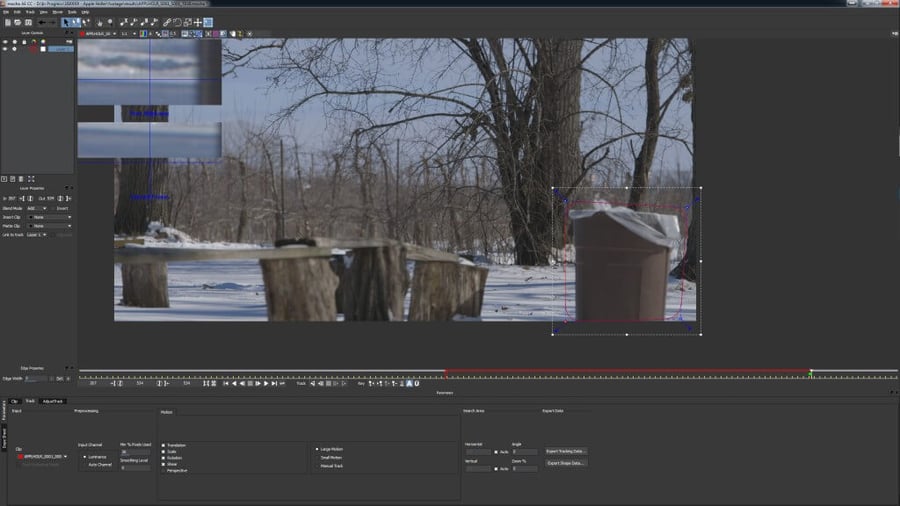 Garbage can your time is near. I've trapped you inside a purple box, soon you will be gone.
 - Beautiful. That's a nice mask you got there. Great job so far (no seriously, it is, that's not sarcasm). From the controls beneath the sequence bar, find the buttons next to the words TRACK and choose the backward arrow on the far left. This will start the tracking of your shape to the beginning of the footage. The beauty of Mocha AE is that unlike After Effects' built-in tracker, when something not related to your garbage can moves within your shape it won't freak out. During this shot, the horse-drawn carriage passes by in the background and falls within the shape we made around the garbage can. Mocha is smart enough to know that the moving object in the background is NOT part of the garbage can we want to track and simply ignores it. It's only looking for the can itself to move, which after a short while when the camera starts panning left, the track will stick to the can like magic. (Not actually magic).
NOTE: For this particular track, the default MOTION settings located at the bottom middle of the window are fine. If your track doesn't quite work the way you want or has issues keeping locked to your item, you might need to play with the settings for motion size, perspective and more. - After your tracking is done, click on the button marked EXPORT TRACKING DATA located near the bottom of your window. This guy is going to open a little window asking you what data you want exported and in what capacity. Choose AFTER EFFECTS TRANSFORM DATA [POSITION, SCALE, AND ROTATION]. This will export out exactly what it says it will, which will be keyframes for the position, scale, and rotation on every frame. Click on the COPY TO CLIPBOARD button, and the window will go away. You're done with Mocha, so feel free to close the program, save your file (or don't, see if I care), and head back to After Effects.
- Wee! We're moving along now, aren't we?!
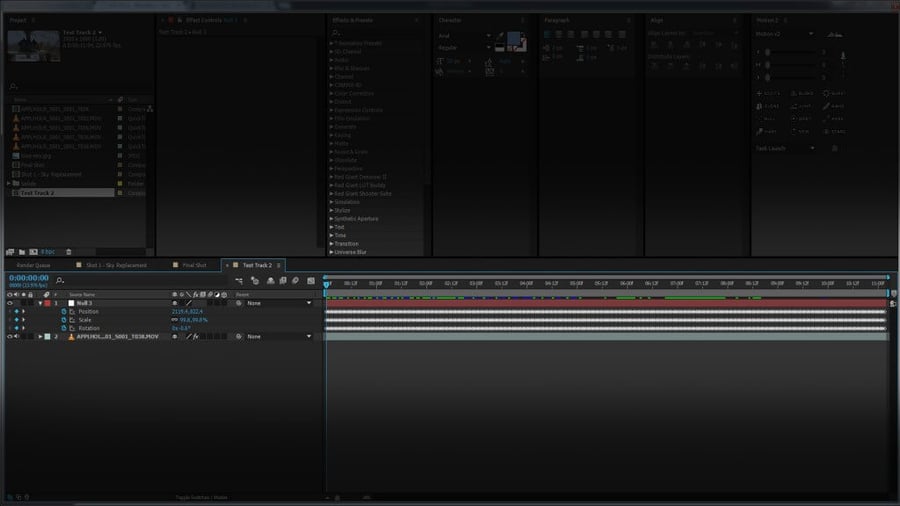 Highlighted to help you understand what you're looking at: the keyframes. The glorious, glorious keyframes...
 - Ignoring the fact that Step 6 was not actually a step but a comment, create a new NULL layer in your project. Name it whatever you want (ie., "TRACKER THING", "GARBAGE REMOVER NULL", "UNNAMED NULL 30029"), put your playhead at the start of the timeline (this is important, otherwise your keyframes will be off resulting in your tracking being off!!), and CTRL-V (or go up to EDIT -> PASTE for you weird non-keyboard shortcut people), and watch as your keyframes are pasted into the NULL.
- Now comes the creative part. Find a still frame of a tree from somewhere that will be taking place of the garbage can soon. You can search around on Google for a while and hope to find one that matches in lighting, quality, size...or...you can search through your raw footage from the shoot and find that the DP happened to film a perfectly isolated tree during the beginning of a different take. Pull that video clip into your project, move the playhead to a spot in the footage where the tree isn't blurry and most of it is viewable in the frame.
- RIGHT-CLICK on the layer and choose TIME -> FRAME FREEZE to lock the shot in place (this way the video is now a picture, which should be pretty self-explanatory). If using a picture of the tree, you can skip this step entirely.
- Grab the PEN TOOL and cut the tree out from its background. How close and perfect of a cutout you get is up to you and the amount of time you have to finish the shot. Since the tree is being cut out of a background very similar to the one it's going into, you're able to get away with not having a perfect cutout (but that won't stop you from still tracing around every nook and cranny in the tree, right...because you care just a little too much)
- Gah! Beautiful job you did there. It looks fantastic. Now move the playhead near the end of your project where the camera has stopped moving (mostly) and position your newly cutout tree over the garbage can. Scale it up a bit and move it around until it completely covers the spot where the garbage can used to be.
- Twirl down the POSITION properties on the tree layer, click on the spiral/curly-q looking tool (also known as the PICK-WIP...seriously who comes up with these things?), and drag to your NULL layer created in Step 7. What this did was parent your tree layer to the NULL's position. Could you have simply copied the motion-tracked keyframes from Step 5 and pasted them to the tree layer? Yes, but it will severely limit what you can do with the layer in the future. If you realize you need to slide the tree down a bit or scale its size you're not going to due to having a keyframe for EVERY FRAME in your timeline. Copying the information to the NULL allows it to handle the position/scale/rotation meanwhile you can move your tree wherever you'd like and not worry about updating each frame.
- Now slide that playhead back and forth and look at that! Woo! The tree moves right along with the garbage can. Every bump. Every pan. Every....uh....thing. Yay! You did it! Now add some motion blur to the layer (don't forget to turn the motion blur on for the project as a whole) and render it!
That wasn't too hard now was it? I know the breakdown above might have seemed unnecessarily long in spots but trust me, the entire process took maybe an hour to do (and that included adding a second tree, some color correction, and grain on the still tree to help it blend better with the grain from the footage [that'll be part of a future tutorial focusing on tiny details often overlooked by editors]).
That last sentence is an English professor's worst nightmare, Jeff.
No one said I was good at proper sentence structure.
Before & After Comparison
TLDR; For you skimmers, here’s a lesson recap
- A perfect shot with a minor blemish can easily be saved with a little motion tracking and something to cover it.
- Knowing how well an item will track is key. If your DP was bouncing the camera all over the place, you'll have a horrible time trying to track one particular item.
- When adding something to the scene, make sure you use an element that easily blends in with your existing footage. Don't put a palm tree in direct sunlight into your snow-covered landscape shot during an overcast day.
- Mocha AE is an awesome tool for tracking an item in your footage. If you can, use it and ignore the one built into After Effects.